Back Lever: How to Do It, Progression and Muscles Worked
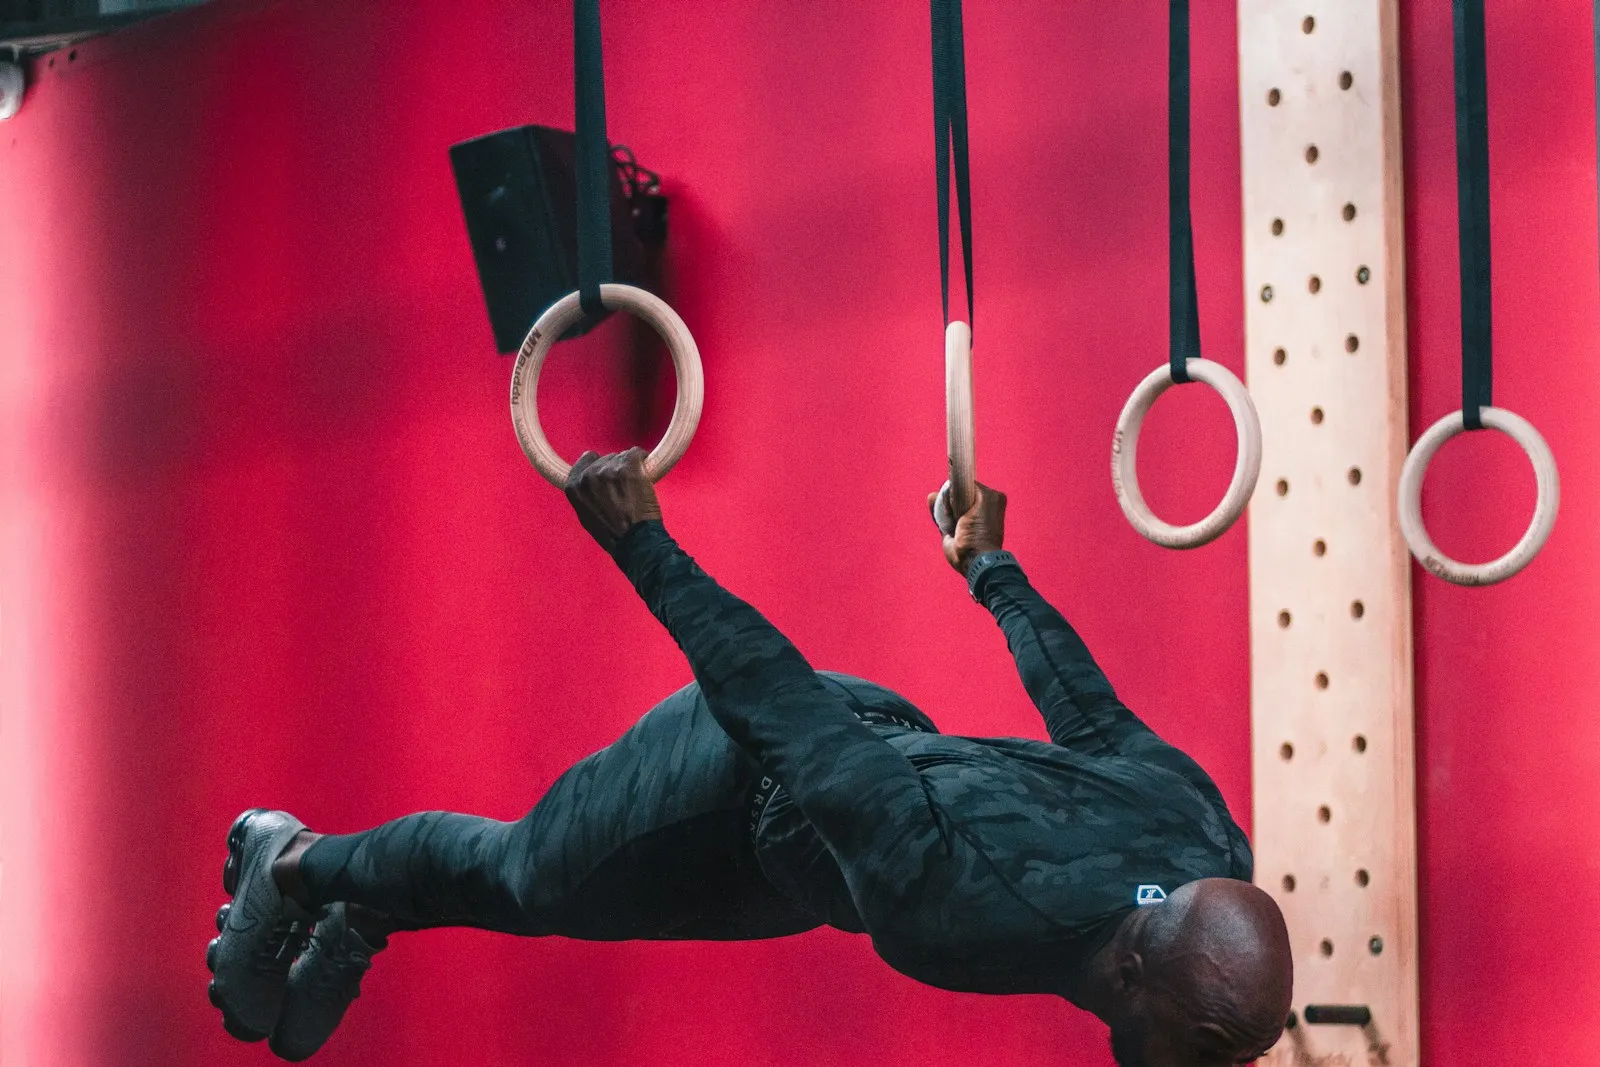
How to do a back lever on rings or a bar: prerequisites, skin the cat, tuck to full progression with exit criteria, a training plan and biceps-safe rules.
The back lever is usually the first “lever” skill a calisthenics athlete achieves: hanging from rings or a bar with straight arms, body horizontal and face down, as if lying on an invisible table. It looks impossible the first time you see it, yet it comes faster than the front lever or the planche for most people. The real challenge isn’t strength alone; it’s preparing the shoulders and biceps for a stretched, loaded position they rarely visit.
The short answer
A back lever is a static hold where you hang with straight arms behind your body and keep it horizontal, face down. It mainly works the lats, chest, front shoulders, biceps and the whole posterior chain. You get there in two phases. First, prepare the shoulders with skin the cat and German hangs. Then climb the ladder: tuck → advanced tuck → one leg or half lay → straddle → full. Train two to three times a week, in sets of 5 to 15 seconds, and move up when you hold 3 × 10 to 15 seconds cleanly. Good prerequisites: 5 to 8 strict pull-ups, 10 dips and a comfortable 20-second German hang.
The rest of this guide walks through each step, the mistakes that cause elbow and shoulder pain, and a sample plan. If you’d like your lever work planned alongside the rest of your training, Titan Mode builds a skills and strength program around the rings or bar you have.
Back lever vs front lever
Both are straight-arm horizontal holds, but they are very different skills.
| Back lever | Front lever | |
|---|---|---|
| Body position | Face down, arms behind the body | Face up, arms in front |
| Main muscles | Lats, chest, front delts, biceps | Lats, rear shoulders, core |
| Usual difficulty | Easier, often learned first | Harder, mostly raw pulling strength |
| Main limiting factor | Shoulder extension mobility and biceps tolerance | Pulling strength and body weight |
| Typical risk | Front of the shoulder and biceps tendon | Elbows (inside and front) |
Many athletes train both. If you’re also working on the face-up version, our front lever progression follows the same tuck-to-full logic; keep the two on different days at first so your straight-arm volume stays manageable.
Are you ready? Prerequisites
| Benchmark | Target |
|---|---|
| Strict pull-ups | 5–8 clean reps |
| Dips | 10 controlled reps to full depth |
| Dead hang | 45 s with active shoulders |
| Skin the cat | 5 slow reps in and out |
| German hang | 20 s, relaxed, without pain |
| Hollow body hold | 30 s |
The German hang is the one people skip, and it’s the one that matters most: if your shoulders can’t comfortably tolerate hanging with the arms behind you, holding a lever there with your body weight leveraged is asking for trouble.
Muscles worked
| Muscle | Role in the hold |
|---|---|
| Latissimus dorsi and teres major | Pull the straight arms toward the hips to hold the body up |
| Pectorals (mainly lower fibers) | Work with the lats to resist the arms being pulled overhead |
| Front deltoids | Stabilize the shoulder in extension |
| Biceps and elbow tissues | Hold the straight arm under load, in a stretched position |
| Lower back, glutes, hamstrings | Keep the hips and legs in line with the torso |
| Abs | Stop the lower back from over-arching into a banana shape |
| Forearms and grip | Hold the rings or bar under a sustained load |
Step 1: prepare the shoulders
Skin the cat
Hang from rings or a bar, tuck your knees, and rotate backward by bringing your knees through your arms until you’re hanging upside down, then keep going as far as is comfortable toward the German hang. Come back the same way, slowly. Start with a partial range and go deeper over the weeks. 3 sets of 3 to 5 slow reps.
German hang
The bottom of the skin the cat: arms behind you, body hanging down, feet toward the floor. Rings are ideal; on a bar, keep your feet on a box or the floor at first to control how much weight you put through the shoulders. Relax into it, breathe, and build from a few seconds to 3 sets of 20 to 30 seconds.
Support exercises
- Straight-arm band pulldowns or straight-arm rows: they teach the lats to work with the elbows locked.
- Inverted rows: pulling strength in a horizontal body position.
- Bicep curls with rings or a towel: some extra tendon tolerance for the biceps, done with control rather than to failure.
Step 2: the back lever progression
The fastest way in is through skin the cat: from the inverted hang, lower slowly toward the horizontal position of your current stage and stop there. Work each stage in sets of 5 to 15 seconds with about 2 minutes of rest, for roughly 30 to 60 seconds of quality holding per session. Move on when you can hold 3 sets of 10 to 15 seconds with a clean position.
Stage 1: tuck back lever
Knees pulled to the chest, back rounded, hips at the same height as the shoulders, arms straight. It’s short and stable; focus on locking the arms and keeping the shoulders away from the ears.
Stage 2: advanced tuck back lever
Flatten the back and open the hips so the thighs point down and the back is horizontal. The lever becomes noticeably longer and the hips tend to drop. Squeeze the glutes and keep the ribs down.
Stage 3: one-leg or half lay back lever
Extend one leg while the other stays tucked (alternate each set), or bend both knees at about 90 degrees with the hips fully open. This stage bridges the big gap between the advanced tuck and the straddle.
Stage 4: straddle back lever
Both legs straight and wide apart. The wider the legs, the shorter the lever. Bring them closer together over the weeks.
Stage 5: full back lever
Legs together, body straight from shoulders to toes, horizontal. Point the toes and squeeze the glutes; a 3 to 5-second hold is already a real achievement.
Check that you’re really horizontal
The most common illusion is a back lever that’s actually tilted, head down. Film yourself from the side at hip height. The hips should be level with the shoulders, and the body should form one straight line, not an arch.
Dynamic exercises to speed things up
- Back lever negatives: from the inverted hang, lower slowly through your current stage toward the German hang, 4 to 5 seconds each. 3 × 3.
- Back lever raises: from the German hang, pull back up to your stage with straight arms, pause 2 seconds. 3 × 3 to 5. Start only once you can hold the stage.
- Band-assisted holds: a band looped under the hips lets you practice a longer lever than you can hold alone. Useful for the body line, not a replacement for unassisted work.
Research on isometric training shows that strength gains are largely specific to the joint angle you train, which is why the actual hold and its negatives must be the core of your training, with support exercises around them.
A sample back lever plan
Two to three sessions a week, at the start of the workout while you’re fresh, with at least one day between sessions.
| Exercise | Sets × work | Rest |
|---|---|---|
| Warm-up: arm circles, dead hang, scapular pulls, 2 easy skin the cats | 5 min | — |
| German hang | 2 × 20 s | 60 s |
| Back lever hold at your stage | 4 × 8–12 s | 2 min |
| Back lever negatives (one stage harder) | 3 × 3 | 2 min |
| Pull-ups | 3 × 6–8 | 2 min |
| Dips | 3 × 8–10 | 2 min |
Log every session: stage, seconds per set and whether your hips stayed level. Holds improve in small steps that are easy to forget between sessions. In Titan Mode, your sessions show sets, hold times and the rest timer, and you log what you did, so moving to the next stage is a decision based on your numbers.
Common back lever mistakes
- Bending the arms. It feels easier because the biceps take over, but it changes the exercise and hides weaknesses. Go back to an easier stage with the arms locked.
- Piking at the hips. Common in the advanced tuck and straddle: the hips drop and the lever gets shorter. Squeeze the glutes and push the hips up.
- Over-arching the lower back. A banana shape takes load off the shoulders and puts it on the spine. Keep the ribs down and the abs engaged.
- Holding the position tilted head-down. Film yourself; if the head is far below the hips, you’re doing an easier version that doesn’t count.
- Skipping skin the cat and German hangs. Strength often arrives before the shoulders tolerate the position, which is when pain in the front of the shoulder starts.
- Swinging into the hold. Enter slowly from the inverted hang so that every second counts and the shoulders aren’t jolted.
- Maxing out every session. Train sub-maximal clean sets and test your best hold every three to four weeks.
A realistic timeline
| Stage | Typical time spent, with prerequisites in place |
|---|---|
| Shoulder preparation | 2 to 6 weeks |
| Tuck | A few weeks |
| Advanced tuck | 1 to 3 months |
| One leg or half lay | 1 to 3 months |
| Straddle | Several months |
| Full | Often 6 to 12 months or more from the start |
These are broad ranges, not deadlines. Heavier and taller athletes usually need longer on each stage, and progress on straight-arm holds often stalls for a few weeks before jumping.
Protect your shoulders and biceps
The back lever puts the front of the shoulder and the long head of the biceps under load in a stretched position. Muscles adapt to new loads within weeks, but tendons and connective tissue adapt more slowly, so strength can outpace what your tissues tolerate.
- Build volume gradually: add a set or a few seconds per week, not both.
- Never fight a hold to failure: stop as soon as the arms bend or the shoulders collapse.
- Respect sharp pain in the front of the shoulder, the biceps or the inside of the elbow: stop, reduce volume for a week, and if it persists, see a doctor or physiotherapist.
- Keep strength work around the skill: a meta-analysis of randomized trials found that strength training reduced sports injuries, so pull-ups, dips and rows are part of your protection, not just support work.
If you’ve dislocated a shoulder or had biceps or rotator cuff problems, ask a professional before training the German hang and the back lever.
Fitting it into your training
The back lever is a pulling skill, so count it in your pulling volume and remove a set or two of rows when you add it. It pairs well with pressing work for the shoulders; our calisthenics shoulder workout covers the overhead pressing and rear-delt work that balance it. Once your back lever is solid, the human flag and the front lever are natural next skills, and the muscle-up uses the same rings and pulling base.
If you train on rings at home, our calisthenics equipment guide explains how to hang them safely. And if you want the whole thing sequenced for you, download Titan Mode: choose the skills and strength goal, tell it you have rings or a bar, and follow your sessions set by set. Your logs, not a fixed date, decide when you move up.
This article is general information, not medical advice. If you have a medical condition, an injury, pain or are pregnant, talk to a health professional before changing your training or diet.
FAQ
Is the back lever easier than the front lever?
For most people, yes. The back lever is usually the first lever skill people achieve, because the chest, front shoulders and biceps can produce a lot of force in that position. It is not risk-free though: it loads the front of the shoulder and the biceps tendon in a stretched position, so it needs a slower build-up than its difficulty suggests.
How long does it take to learn the back lever?
With the prerequisites in place, many people hold a tuck back lever within a few weeks and a straddle within several months. A clean full back lever often takes six months to a year or more. Body weight, limb length, shoulder mobility and training history all change the timeline.
What muscles does the back lever work?
Mainly the lats and teres major, the chest (especially the lower fibers), the front of the shoulders and the biceps, which hold the straight arm under load. The lower back, glutes and hamstrings keep the body straight, and the abs stop the lower back from over-arching.
Should I learn the back lever on rings or a bar?
Rings are the classic choice: the hands can rotate, which is easier on the elbows and wrists, and getting into position through skin the cat is smoother. A bar works fine too, but the grip is fixed and entering the hold is more awkward. Pick what you can train on consistently.
Can I do the back lever with bent arms?
A bent-arm version exists and is a decent strength exercise, but it is a different movement. The standard back lever is held with straight arms; bending them shifts the load and hides weaknesses. Use an easier lever (a tighter tuck) rather than bending the elbows.
Is the back lever bad for your shoulders?
Not if you build up gradually. The position stretches the front of the shoulder and biceps under load, which is why skin the cat and German hangs come first, why volume stays low at the start, and why you stop at sharp pain in the front of the shoulder or elbow. If you have a history of shoulder dislocation or biceps tendon problems, get advice from a professional before starting.
Sources
- Oranchuk DJ et al. (2019). Isometric training and long-term adaptations: effects of muscle length, intensity, and intent: a systematic review. Scand J Med Sci Sports.
- Magnusson SP, Kjaer M (2019). The impact of loading, unloading, ageing and injury on the human tendon. J Physiol.
- Lauersen JB, Bertelsen DM, Andersen LB (2014). The effectiveness of exercise interventions to prevent sports injuries: a systematic review and meta-analysis of randomised controlled trials. Br J Sports Med.
- American College of Sports Medicine (2009). Progression models in resistance training for healthy adults. Med Sci Sports Exerc.