Pike Push-Up: How to Do It, Muscles Worked, Progression
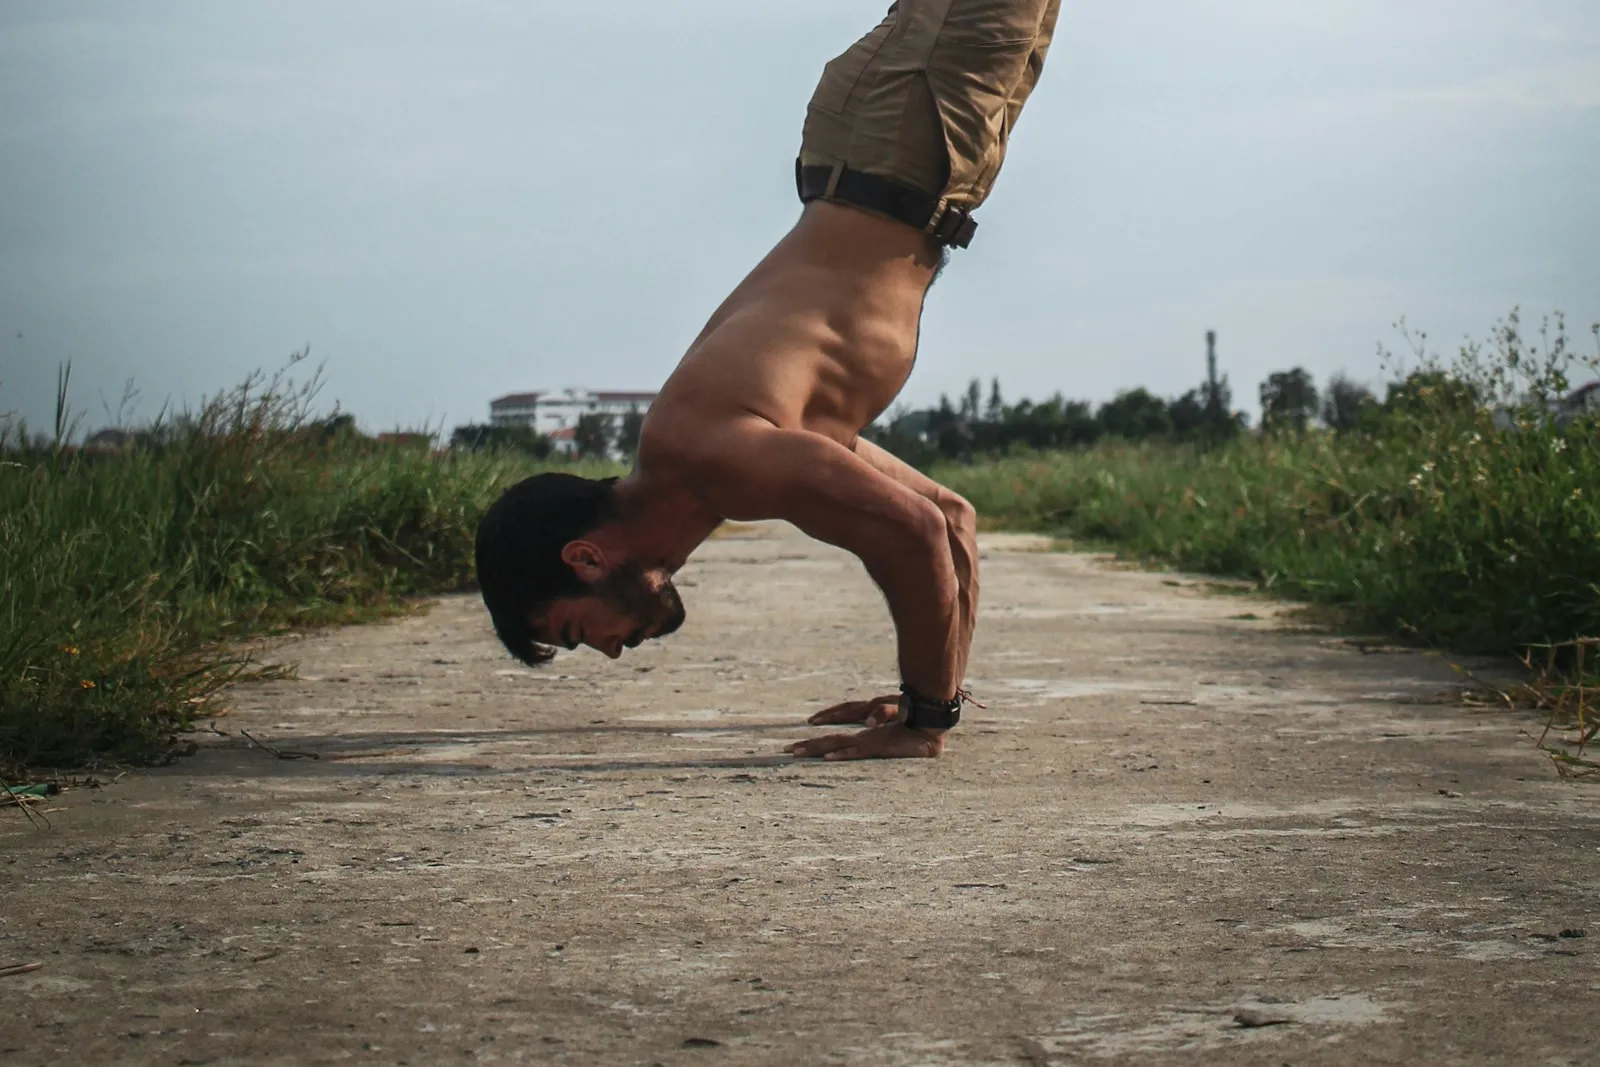
How to do a pike push-up with good form, the muscles it works, easier and harder versions, and a path from your first pike to the handstand push-up.
The pike push-up is the bodyweight answer to the overhead press. You flip a regular push-up into an upside-down V, and suddenly the work moves from your chest to your shoulders. It needs no equipment, it fits in any home workout, and it’s the standard first step towards the handstand push-up.
The short answer: to do a pike push-up, start in a push-up position, walk your feet towards your hands and lift your hips until your body forms an inverted V. Bend your elbows at about 45 degrees and lower the top of your head towards a point a little in front of your hands, so your head, hands and feet form a triangle on the floor. Press back up until your arms are straight and your shoulders push towards your ears. The closer your feet are to your hands and the higher they are, the harder it gets. Start with 3 sets of 5 to 10 clean reps, two or three times a week.
Below: step-by-step form, the muscles worked, the mistakes that hurt wrists and shoulders, a 7-level progression from the easiest version to the wall handstand push-up, and a weekly plan. If you’d rather not program it yourself, Titan Mode builds a full calisthenics plan around your level and the equipment you have, with pike push-ups slotted into the right days.
What is a pike push-up?
A pike push-up is a push-up done with your hips high and your body folded at the hips, the “pike” position from gymnastics. Instead of pushing your body forwards and away from the floor like a regular push-up, you push it upwards, along a line close to your arms. That makes it a vertical push, in the same family as the overhead press and the handstand push-up.
That matters for balance in your training. Most beginner routines are full of horizontal pushing (push-ups, dips) and short on overhead work. Adding a vertical push rounds out the shoulders and builds the strength you need for every inverted skill. It’s why the pike push-up sits in the vertical push slot of our 12-week beginner calisthenics program, and why it anchors every routine in our calisthenics shoulder workout, next to rows for the rear delts.
Muscles worked
- Front deltoids: the main movers. They lift your body back up from the bottom position.
- Side deltoids: they help, especially as you press towards straight arms.
- Triceps: they straighten your elbows, and they work hard in the top half of the rep.
- Upper trapezius and serratus anterior: they rotate your shoulder blades upwards so your arms can go overhead safely. This is the “push your shoulders to your ears” part of the lockout.
- Upper chest: it assists, more so when your hips are lower.
- Core, hip flexors and legs: they hold the V shape still, so the work stays in your shoulders.
Changing your body angle changes the load. In a classic study measuring the forces under the hands, a regular push-up put roughly two-thirds of body weight through the arms, a knee push-up less, and raising the feet more (Ebben et al., 2011). The pike push-up follows the same logic: the higher your hips and feet, the more of your weight your shoulders carry, until a handstand push-up asks them to press almost all of it.
How to do a pike push-up, step by step
- Start in a push-up position, hands shoulder-width apart, fingers spread and pointing forwards.
- Walk your feet in towards your hands and lift your hips high. Your body should form an inverted V. Legs straight if your hamstrings allow it; a slight knee bend is fine.
- Stack your shoulders. Shift your weight forwards a little so your shoulders sit above or slightly in front of your hands, not behind them.
- Lower your head by bending your elbows at about 45 degrees from your body, not straight out to the sides. Your head travels towards a spot a few centimetres in front of your hands, so your hands and the top of your head form a triangle.
- Touch lightly with the top of your head, or stop just above the floor. Never let your head take your weight.
- Press back up in a straight line until your arms are locked out, then push the floor away so your shoulders rise towards your ears.
- Control every rep. Two to three seconds down, a short pause, then up. Breathe in on the way down, out on the way up.
Every rep should look the same. If your hips drop towards a regular push-up, or your head lands behind your hands, the set is over: rest, then reset the position.
Common mistakes
- Head behind the hands. It cramps your neck and turns the rep into a short, awkward triceps press. Aim in front of your hands.
- Elbows flared at 90 degrees. Hard on the front of the shoulder. Keep them at around 45 degrees, pointing back rather than sideways.
- Hips sinking as you tire. The exercise quietly becomes a decline push-up. Keep your hips high or end the set.
- Feet too far away. Easier, but most of the load moves back to the chest (if the chest is what you want to train, follow a dedicated calisthenics chest workout instead). Walk your feet in as you get stronger.
- Half reps. Stopping halfway down skips the hardest and most useful part. Shorten the range only on purpose, as a step in the progression.
- No warm-up. Wrists and shoulders take a lot of load in this position. Two to three minutes of preparation makes a real difference.
Pike push-up progression: 7 levels
Start at the first level where you can do at least 5 clean reps. Move on when you hit the target on every set, in two sessions in a row. Change one thing at a time so you can compare sessions.
| Level | Variation | Move on when |
|---|---|---|
| 1 | Hands-elevated pike: hands on a bench or step, feet on the floor | 3 × 12 |
| 2 | Floor pike push-up, feet far back, partial range | 3 × 10 |
| 3 | Floor pike push-up, feet close, head touching the floor | 3 × 10 to 12 |
| 4 | Elevated pike push-up: feet on a chair or box, hips bent at 90° | 3 × 8 to 10 |
| 5 | Deficit pike push-up: hands on parallettes or books, head goes below hand level | 3 × 8 |
| 6 | Wall handstand push-up negatives (slow lowering, 3 to 5 s) or partial range on a cushion | 3 × 5 |
| 7 | Full wall handstand push-up | — |
Level 1 is the hidden gem. With your hands raised, your shoulders carry less weight and your wrists bend less, which makes it the best entry point if regular pike push-ups feel impossible or hurt your wrists.
Level 4 is the big jump. With your feet on a box, your body gets close to vertical. Set the box so your hips are above your shoulders and your upper body is almost upside down. Walk your hands closer to the box as you get stronger.
Level 6 is where the handstand push-up begins. Kick up to a wall handstand, belly or back to the wall, then lower yourself to the top of your head as slowly as you can. Come down with your feet and reset between reps. Use a folded mat or cushion under your head the first few weeks and shorten the range if you need to, then lower the cushion over time.
If you can’t hold a wall handstand for 30 seconds yet, build that first: our guide to the handstand for beginners covers wrist prep, wall drills and safe exits step by step.
Pike push-ups for beginners: are you ready?
You can start floor pike push-ups if you can do roughly 10 to 15 clean regular push-ups and hold a plank for 30 seconds. If not, the regular push-up is the better place to invest your time for now: our push-up progression takes you from wall push-ups to the floor, and the hands-elevated pike above can run alongside it.
Weekly plan: from floor pikes to handstand push-up negatives
Bodyweight training works for strength and muscle the same way weights do: sets taken close to failure, made harder over time. A trial in which beginners did progressive push-up variations found strength and muscle thickness gains similar to bench press training (Kotarsky et al., 2018), and a meta-analysis found that lighter loads for more reps build similar muscle to heavy loads when sets are hard enough (Schoenfeld et al., 2017).
- Frequency: two or three sessions a week, with at least one rest day between hard shoulder sessions, in line with standard resistance training guidance for novices (ACSM, 2009).
- Volume: 3 to 4 sets of 5 to 12 reps, stopping one to three reps before your form breaks.
- Rest: 90 seconds to 2 minutes between sets.
- Balance: pair each pushing session with pulling work (rows, pull-ups or chin-ups) so your shoulders don’t end up front-heavy.
Example 8-week plan
| Weeks | Session A | Session B |
|---|---|---|
| 1–2 | Pike push-ups at your level 3 × 6–10 + rows 3 × 8–12 | Push-ups 3 × 8–15 + pike hold 3 × 20 s |
| 3–4 | Pike push-ups 4 × 6–10 (one step harder if possible) + rows | Pike push-ups 3 × 8 with a 3-second lowering + push-ups |
| 5–6 | Elevated pike push-ups 3 × 5–8 + wall handstand hold 3 × 20–30 s | Floor pikes 3 × 10–12 + dips or push-ups |
| 7–8 | Elevated or deficit pikes 4 × 5–8 + wall handstand hold | Wall handstand push-up negatives 3 × 3 + retest your floor max |
Write down the variation, the box height and the reps, not just “pike push-ups”: “8 reps” means nothing without the setup. That’s where a training log earns its keep. With Titan Mode, each guided session shows your sets, reps and rest times, and your weekly check-ins show whether your pressing is actually moving.
Pike push-ups at home: setups that work
- Hands elevated: a sturdy step, the bottom stair or a low bench. Make sure it can’t slide.
- Feet elevated: a chair against a wall, a sofa or a stable box. Test it with your full weight first.
- Deficit: two stacks of thick books or parallettes. Only with stable, non-slip supports.
- Head target: a folded towel or yoga mat under your head keeps the touch light and the range consistent.
Pike push-ups slot into any no-equipment routine. You’ll find complete sessions by level in our guide to calisthenics workouts at home without equipment.
Wrist and shoulder safety
The pike push-up puts your wrists in strong extension under a lot of load, and wrist pain is common in sports that bear weight on the hands, such as gymnastics (DiFiori et al., 2002). Treat your wrists like any other joint you train.
- Warm up for two to three minutes: wrist circles, gentle rocking on all fours with fingers forwards then backwards, and a few easy shoulder circles and scapular push-ups.
- Spread your fingers and grip the floor with your fingertips to share the load across the hand.
- Use a raised surface or parallettes if your wrists complain. A neutral grip on parallettes bends the wrist less.
- Build volume slowly: add sets or a harder level, not both in the same week.
- Stop at sharp pain, numbness or pain that persists after training, and get it checked if it doesn’t settle within a few days.
If you have a shoulder injury or high blood pressure, check with a health professional before training upside down, and stay at levels 1 to 3 until you have the all-clear.
Where pike push-ups fit in your training
Think of your upper body in four patterns: horizontal push (push-ups, dips), vertical push (pike push-ups), horizontal pull (rows) and vertical pull (pull-ups). A balanced week trains all four. A simple upper-body session could be: pike push-ups 3 × 8, rows or pull-ups 3 × 8, dips or push-ups 3 × 8, and a core hold such as the hollow body.
The overhead strength you build here carries over to the rest of calisthenics. It makes handstand work easier, prepares the front shoulders for the planche progression, supports the press-out at the top of a muscle-up and keeps your shoulders strong in positions a regular push-up never reaches.
This article is general information, not medical advice. If you have a medical condition, an injury, pain or are pregnant, talk to a health professional before changing your training or diet.
FAQ
What muscles do pike push-ups work?
Mainly the shoulders, especially the front deltoids, with a lot of help from the triceps and the upper trapezius. The upper chest and the serratus anterior assist, and the core and legs work to hold the inverted V shape. It's the closest bodyweight equivalent to an overhead press.
Are pike push-ups harder than regular push-ups?
For most people, yes. Your hands carry more of your body weight than in a regular push-up as your hips rise, and the shoulders are a smaller muscle group than the chest. If you can do 10 to 15 clean regular push-ups, you're usually ready to start floor pike push-ups.
How many pike push-ups should I be able to do?
There is no official standard. As a training target, 3 sets of 8 to 12 clean floor pike push-ups with your head touching the floor is a solid beginner-to-intermediate level, and 3 sets of 8 elevated pike push-ups with your feet on a box at hip height is a good sign you're ready to start wall handstand push-up negatives.
Do pike push-ups build bigger shoulders?
They can. Bodyweight exercises build muscle when sets are taken close to failure and made harder over time, just like weights. Pike push-ups mostly load the front of the shoulders, so pair them with pulling work such as rows and pull-ups, and add lateral and rear shoulder work if size is your main goal.
Do pike push-ups help with handstands?
They build the overhead pressing strength and the shoulder position a handstand needs, but they don't teach balance. Train both: pike push-ups for strength, wall holds and kick-up practice for balance.
Why do pike push-ups hurt my wrists or shoulders?
Usually because you skipped the warm-up, your hands are too close to your feet, or your elbows flare straight out to the sides. Warm up your wrists, start with your hands on a raised surface or on parallettes, keep your elbows at about 45 degrees and stop the set at the first sharp pain. Pain that persists deserves a check by a health professional.
Sources
- Ebben W.P. et al. (2011). Kinetic analysis of several variations of push-ups. J Strength Cond Res.
- Kotarsky C.J. et al. (2018). Effect of progressive calisthenic push-up training on muscle strength and thickness. J Strength Cond Res.
- Schoenfeld B.J. et al. (2017). Strength and hypertrophy adaptations between low- vs. high-load resistance training: a systematic review and meta-analysis. J Strength Cond Res.
- American College of Sports Medicine (2009). Position stand: progression models in resistance training for healthy adults. Med Sci Sports Exerc.
- DiFiori J.P. et al. (2002). Wrist pain in young gymnasts: frequency and effects upon training over 1 year. Clin J Sport Med.