Plank Exercise: Form, How Long to Hold, Variations
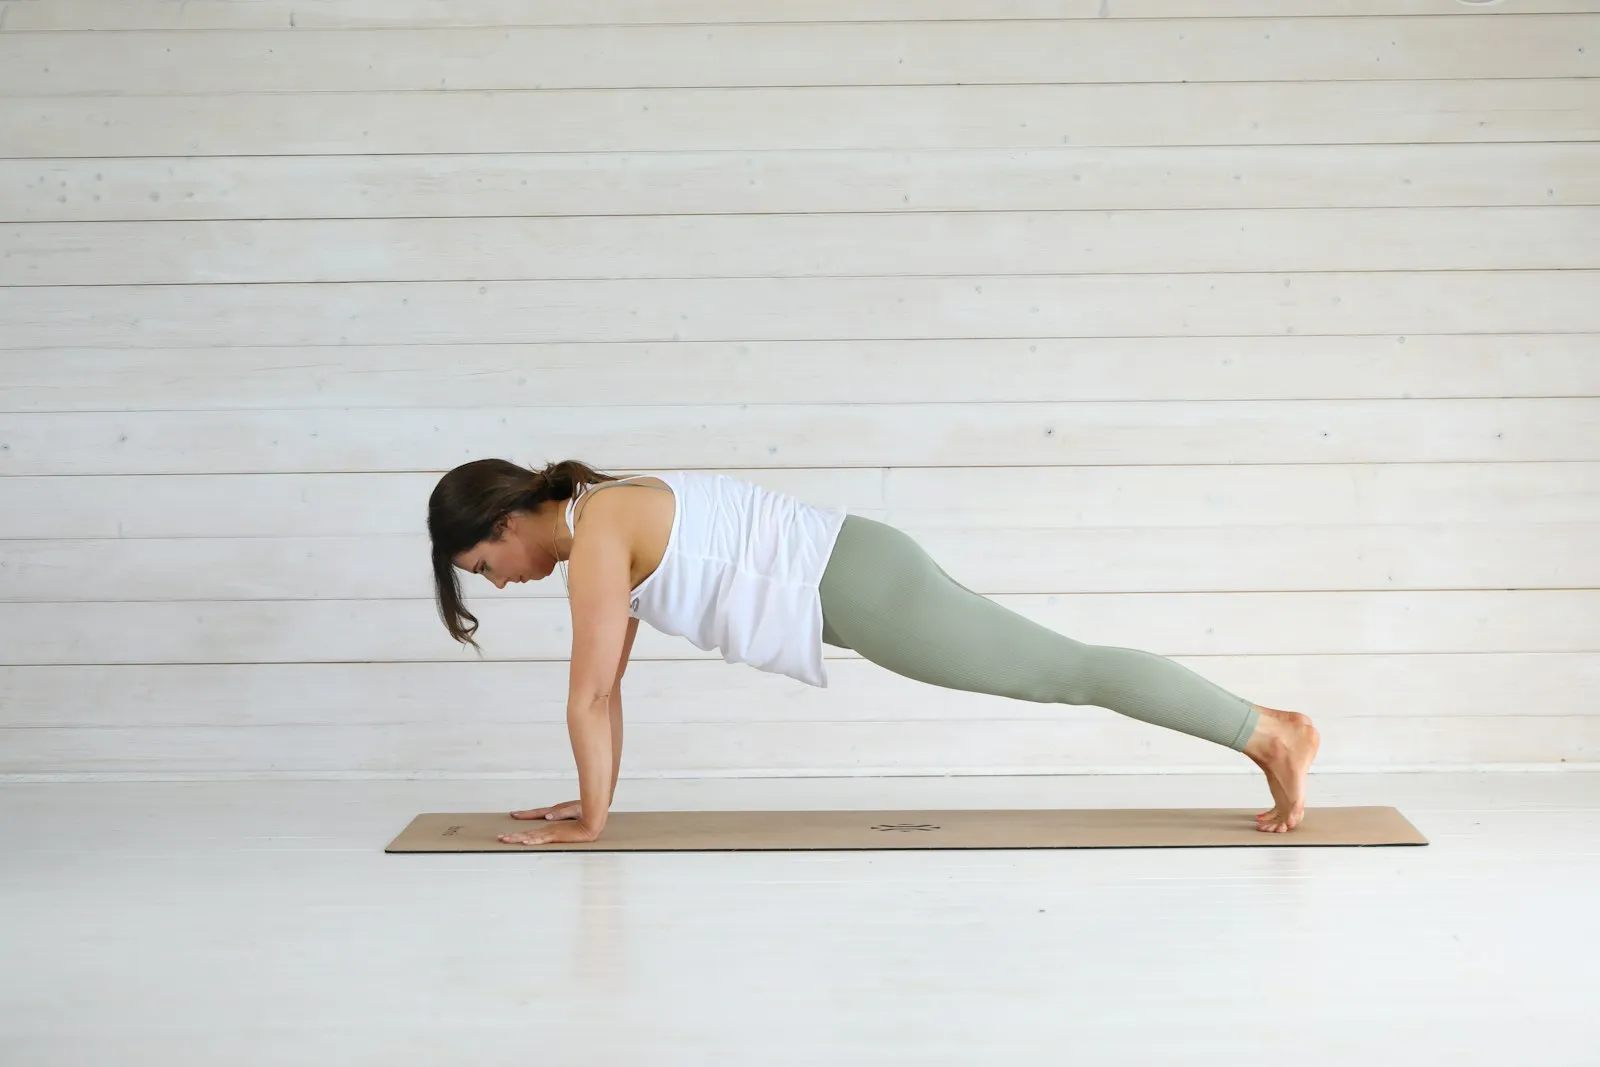
How to do a plank with good form, muscles worked, how long to hold it by level, common mistakes, 10 variations from easy to hard and a 6-week plan.
The plank is probably the most prescribed core exercise in the world, and one of the most badly done. Hips sagging, shoulders shrugged, phone timer running toward a five-minute record: most of those holds train patience more than abs. Done properly, though, the plank is a short, hard and very useful exercise, and the first step of a progression that goes all the way to the dragon flag.
In short: get on your forearms and toes, elbows under your shoulders, body in one straight line from head to heels. Squeeze your glutes, pull your ribs down toward your hips and push the floor away with your forearms. Breathe and hold without letting the hips drop or rise. Start with 3 sets of 15 to 30 seconds, two to four times a week, and build to 3 sets of 60 seconds with perfect form. Past 60 to 90 seconds, don’t chase time: switch to a harder variation such as the RKC plank, the long-lever plank or the body saw.
Below you’ll find the exact technique, the muscles involved, how long you should be able to hold a plank at your level, the mistakes that make it useless, ten variations ranked from easiest to hardest and a six-week plan. If you’d rather have your core work placed inside a full program, Titan Mode builds a weekly calisthenics plan around your level, your schedule and your equipment, with each exercise demonstrated.
What is a plank?
A plank is an isometric (static) core exercise: you hold your body straight like a board, face down, supported on your forearms or hands and your toes. Nothing moves. The work comes from gravity pulling your hips toward the floor, which your abdominal muscles must resist to keep the lower back from arching.
Coaches call this anti-extension: the job is not to bend the spine, as in a crunch, but to stop it from bending. That is exactly what your trunk does in a push-up, a handstand, a sprint or when you carry something heavy. It is also why core researchers such as Stuart McGill favour exercises that keep the spine still under load over repeated flexion (McGill, 2010).
The two basic positions:
- Forearm plank (low plank): on the forearms. The standard version, and the one most tests use.
- High plank (straight-arm plank): on the hands, arms straight, like the top of a push-up. Slightly easier for the abs, more work for the shoulders and wrists.
Muscles worked
- Rectus abdominis: the “six-pack” muscle, which keeps the pelvis from tipping forward and the lower back from sagging.
- Transverse abdominis and obliques: the deep and side layers of the abdominal wall, which brace the trunk like a belt.
- Glutes: they keep the hips extended and level. Squeezing them makes the plank noticeably harder, in a good way.
- Shoulders, chest and serratus anterior: they hold the upper body up and keep the shoulder blades from collapsing together.
- Quadriceps: they lock the knees straight.
The plank is a whole-body exercise with the abs in the lead role, which is why it carries over so well to push-ups and other calisthenics movements.
How to do a plank, step by step
- Set your elbows: kneel, then place your forearms on the floor, elbows directly under your shoulders, forearms parallel or hands lightly together.
- Step back: extend one leg, then the other, toes tucked, feet about hip-width apart (closer together is harder).
- Line up: head, shoulders, hips, knees and ankles in one straight line. Look at the floor just in front of your hands, neck long.
- Brace: pull your ribs down toward your pelvis and tilt the pelvis very slightly under, as if you were tucking your tailbone. Your lower back should feel flat, not arched.
- Squeeze: glutes tight, quads tight, push the floor away with your forearms so your upper back doesn’t sink between the shoulder blades.
- Breathe: short, steady breaths without letting the belly hang. If you have to hold your breath, the version is too hard.
- Stop at form failure: the set ends when the hips drop, rise or start to shake out of line, not when you collapse.
For a high plank, do the same with your hands under your shoulders, fingers spread and arms straight.
Cues that help
- “Ribs to hips”: stops the lower back from arching.
- “Glutes like you’re cracking a walnut”: levels the hips instantly.
- “Push the floor away”: fills the gap between the shoulder blades.
- “Long from head to heels”: reach the crown of your head forward and the heels back.
How long should you hold a plank?
There is no official standard, but there is useful data. In a study of 471 college students who held a forearm plank to failure under strict form rules, the median was about 110 seconds for men and 72 seconds for women, with athletes holding longer than non-athletes (Strand et al., 2014). Those are maximal tests in young, active people, not training targets, but they give a sense of scale.
For training, these practical markers work well:
| Level | Clean forearm plank | What to do |
|---|---|---|
| Beginner | Under 30 s, or knees down | 3 × 10–20 s, incline or knee plank if needed |
| Intermediate | 30–60 s | 3 × 30–45 s, add shoulder taps and side planks |
| Solid | 60–90 s | Stop adding time: move to RKC or long-lever planks |
| Advanced | 2 min or more | Body saw, one-arm/one-leg planks, ab wheel, hollow work |
The most useful answer to “how long” is: as long as you can keep perfect form, up to about a minute, then make it harder.
Is a longer plank better?
Not really. Once you can hold 60 to 90 seconds, each extra minute mostly trains endurance in a position your abs already find easy. Five-minute planks look impressive, but by then the lower back and shoulders are usually doing a lot of the work.
Making the plank harder is more effective than making it longer. A study comparing variations found that a long-lever plank with a posterior pelvic tilt, elbows placed further forward and the pelvis tucked under, produced significantly higher activity in the upper rectus abdominis, the external obliques and the lower abdominal stabilizers than the traditional plank, and the longer lever was the main reason (Schoenfeld et al., 2014). EMG work on other abdominal exercises points the same way: rollout-type movements, where the arms reach far in front of the body, were among the most demanding for the abs (Escamilla et al., 2006).
The practical rule: when a set of 60 seconds becomes easy, move up a variation and go back to 20 to 30 seconds.
Common mistakes
- Sagging hips: the classic. The lower back arches and takes the load. Squeeze the glutes, pull the ribs down, or go to an easier version.
- Hips piked up: an inverted V makes the plank easier and takes the abs out of it. Lower the hips until they line up with the shoulders and heels.
- Shoulders collapsing: the chest sinks and the shoulder blades pinch together. Push the floor away.
- Head hanging or craning: keep the neck in line, gaze slightly in front of the hands.
- Holding the breath: fine for 10 seconds, not for 60. Practise breathing while braced.
- Chasing a record with bad form: the last 30 seconds of a sloppy hold do more for your ego than your abs.
Plank variations: from easiest to hardest
Pick the first level you can hold for 3 × 20 seconds with clean form. Move on when 3 × 45 to 60 seconds (or the rep target) feels controlled.
| Level | Variation | How it works | Move on at |
|---|---|---|---|
| 1 | Incline plank | Forearms or hands on a bench, table or wall | 3 × 60 s |
| 2 | Knee plank | Forearm plank with knees down, straight line from head to knees | 3 × 60 s |
| 3 | Forearm plank / high plank | Standard versions above | 3 × 60 s |
| 4 | Side plank | On one forearm, feet stacked, hips lifted; works the obliques | 3 × 30–45 s per side |
| 5 | Plank shoulder taps | High plank, touch the opposite shoulder without the hips rocking | 3 × 20 taps |
| 6 | Dynamic plank (plank up-downs) | Go from forearms to hands and back, one arm at a time, hips still | 3 × 10 reps |
| 7 | RKC plank | Elbows slightly ahead of the shoulders, glutes, quads and abs squeezed to the maximum, elbows pulled toward the toes | 3 × 15–20 s |
| 8 | Long-lever plank | Elbows 10 to 20 cm in front of the shoulders, pelvis tucked | 3 × 30 s |
| 9 | Body saw | Forearm plank, slowly rock the body forward and back a few centimetres | 3 × 10 slow reps |
| 10 | One-arm or one-leg plank, Copenhagen plank | Remove a support point, or side plank with the top leg on a bench | 3 × 20–30 s per side |
A few notes on the most searched variations:
- Side plank: the go-to for the obliques and the sides of the trunk. It is also step one toward the human flag, which is essentially a side plank held on a pole.
- Copenhagen plank: a side plank with the top leg resting on a bench and the bottom leg free. It loads the inner thigh (adductors) hard. In a trial with 652 football players, a programme built on the Copenhagen adduction exercise lowered the odds of reporting groin problems by about 41% compared with usual training (Harøy et al., 2019). Start with the knee on the bench, not the foot.
- Reverse plank: face up, hands or forearms behind you, hips lifted into a straight line. It trains the back of the body (glutes, hamstrings, upper back) and pairs well with the glute bridge, its easier floor version.
- Plank shoulder taps and dynamic planks add an anti-rotation element: the hips want to rock as you lift a hand, and your obliques stop them. To train active rotation as well, see our Russian twist guide, including when to leave it out.
After level 10, the plank turns into other exercises: the ab wheel rollout, the hollow body hold, which trains the same anti-extension job lying on your back, and eventually the dragon flag. To balance all that front-of-core work, add the superman exercise for the back of the trunk.
A 6-week plank progression plan
Three sessions a week, at the end of your workout, 60 seconds of rest between sets. Use the variation that fits your level from the table above, and add one side plank set per side each session.
| Week | Main plank | Extra |
|---|---|---|
| 1 | 3 × 20 s at your level | Side plank 2 × 15 s per side |
| 2 | 3 × 30 s | Side plank 2 × 20 s |
| 3 | 4 × 30 s | Shoulder taps 2 × 16 |
| 4 | 3 × 45 s, or 3 × 20 s at the next level | Side plank 3 × 25 s |
| 5 | 3 × 45–60 s | Shoulder taps 3 × 20 |
| 6 | Test: one max hold at your level, then 2 × 20 s RKC plank | Side plank max hold per side |
If the hips drop before the target time, end the set and repeat the week. Write down the seconds you actually held, not the ones you planned: that number decides when you move up. Keeping that log honest across all your exercises is easier with a plan that tracks it for you; Titan Mode logs your sets, includes a rest timer and lets you swap an exercise for an easier or harder version when the numbers say so.
Benefits of the plank (and its limits)
What the plank does well:
- Teaches a stiff, stable trunk, which makes push-ups, squats and overhead work safer and more efficient. A sagging plank and a sagging push-up are the same problem; see our push-up progression to fix both.
- Needs nothing: no equipment, two square metres of floor.
- Scales from rehab to advanced, from incline planks to body saws.
- Is easy on the spine for most people compared with repeated sit-ups (McGill, 2010).
What it doesn’t do:
- It won’t burn belly fat. A controlled trial found that six weeks of abdominal exercises alone did not reduce abdominal fat (Vispute et al., 2011). Visible abs come from lower body fat; our guide to calisthenics for weight loss explains how training and diet combine.
- It doesn’t cover the whole core. The plank resists arching. You also need exercises that resist side bending (side plank), resist rotation (shoulder taps, bird dog) and bring the legs up (leg raises). Our calisthenics abs workout puts all four together in routines by level.
- It isn’t a strength test after two minutes. Beyond that, you are mostly measuring endurance and tolerance to discomfort.
Safety
- Lower back pain during planks usually means the version is too hard or the hips are sagging. Regress to a knee or incline plank. Ongoing back pain, or pain spreading into a leg, needs to be assessed before you load the core hard.
- Shoulder or wrist discomfort: use the forearm version instead of the high plank, or an incline plank to reduce the load. Push the floor away so the shoulder blades don’t collapse.
- Pregnancy and after birth: ask your midwife or doctor before doing standard planks, and check with a postnatal physiotherapist before going back to them, especially if you see doming along the middle of your belly.
- High blood pressure: avoid holding your breath during long holds; keep breathing steadily.
- Hernia or recent abdominal surgery: get medical clearance first.
Short, hard, and then harder
The plank works best when you stop treating it as an endurance contest. Hold a clean line, breathe, end the set when the form goes, and when one minute is easy, make the exercise harder instead of longer. A few weeks of that and the stability shows up everywhere else: straighter push-ups, steadier handstands and a trunk that stays put when the load gets heavy.
This article is general information, not medical advice. If you have a medical condition, an injury, pain or are pregnant, talk to a health professional before changing your training or diet.
FAQ
How long should I hold a plank?
Long enough to be hard with perfect form, and no longer. For most people that means 3 sets of 20 to 60 seconds. Beginners start at 10 to 20 seconds, a clean 60 seconds is a solid level, and past about 90 seconds a harder variation (RKC plank, long-lever plank, body saw) is a better use of your time than a longer hold.
What muscles does the plank work?
Mainly the front of the core: the rectus abdominis, the transverse abdominis and the obliques, which stop your lower back from sagging. The glutes keep the hips level, and the shoulders, chest and serratus anterior hold the upper body up. The quads work to keep the knees straight.
Is it OK to plank every day?
Short plank sets on most days are fine for most healthy people, but they are not necessary. Two to four sessions a week, each with a few hard sets, is enough to progress. If your lower back or shoulders start to ache, cut the volume and check your form.
Do planks burn belly fat?
No. Planks strengthen your abs, but they do not burn the fat that covers them. A controlled trial found that six weeks of abdominal exercise alone did not reduce belly fat. Visible abs depend on your overall body fat, which is set mostly by your diet and total activity.
What is the difference between a plank and an RKC plank?
The RKC plank is a short, maximal-tension version: elbows closer to the head, glutes and quads squeezed as hard as possible and elbows pulled toward the toes. It is much harder, so sets last 10 to 20 seconds instead of a minute.
Are planks good for back pain?
Many back rehab programs use planks because they train the trunk to stay still, and they are often better tolerated than sit-ups. But a plank done with a sagging back can aggravate pain. Use an easier version you can hold cleanly, and if pain persists or spreads into a leg, see a doctor or physiotherapist.
Are planks safe during pregnancy?
Some people keep doing modified planks in pregnancy, but standard planks load the front of the abdomen heavily, especially later on. Ask your midwife or doctor first, and after birth check with a postnatal physiotherapist before going back to full planks, particularly if you notice doming along the middle of your belly.
Sources
- Strand S.L. et al. (2014). Norms for an isometric muscle endurance test. J Hum Kinet.
- Schoenfeld B.J. et al. (2014). An electromyographic comparison of a modified version of the plank with a long lever and posterior tilt versus the traditional plank exercise. Sports Biomech.
- Escamilla R.F. et al. (2006). Electromyographic analysis of traditional and nontraditional abdominal exercises: implications for rehabilitation and training. Phys Ther.
- McGill S.M. (2010). Core training: evidence translating to better performance and injury prevention. Strength Cond J.
- Harøy J. et al. (2019). The Adductor Strengthening Programme prevents groin problems among male football players: a cluster-randomised controlled trial. Br J Sports Med.
- Vispute S.S. et al. (2011). The effect of abdominal exercise on abdominal fat. J Strength Cond Res.