Glute Bridge: Form, Muscles Worked, Progression
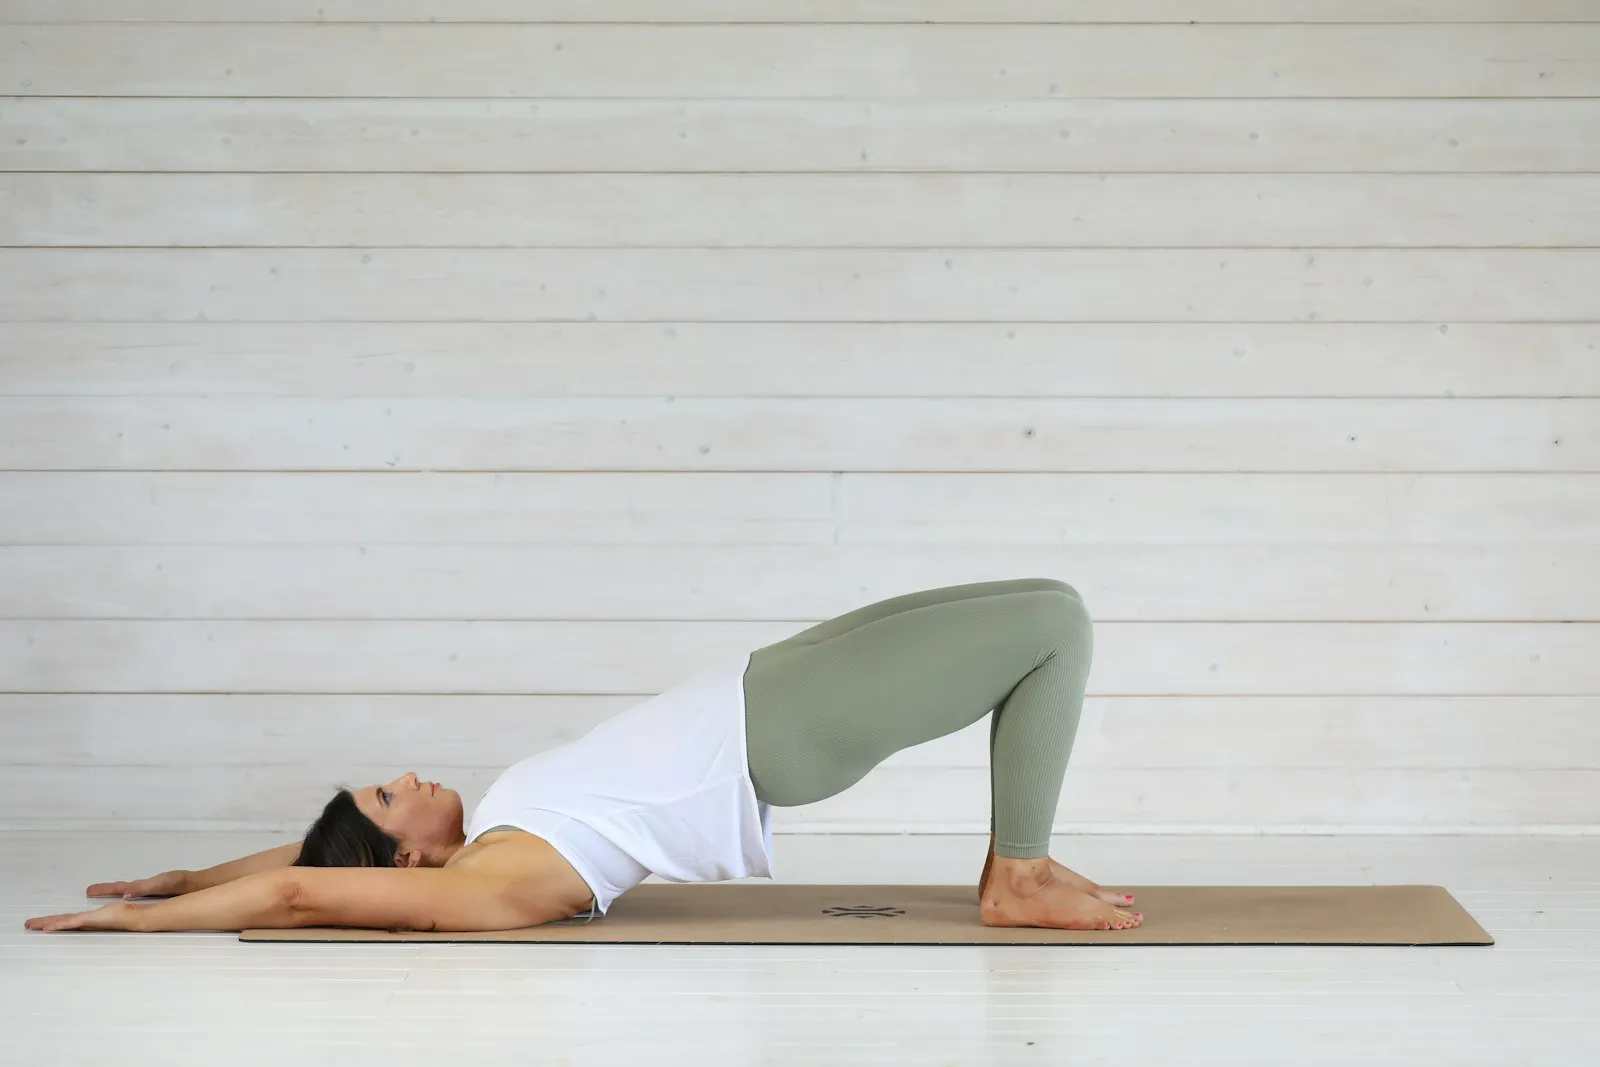
How to do a glute bridge with good form, the muscles it works, common mistakes, a bodyweight progression to the single-leg hip thrust and a 6-week plan.
The glute bridge is the exercise most people get almost right. Hips go up, hips come down, and it feels like something is happening. But plenty of people feel it mostly in their lower back or their hamstrings, and very little in the muscle the exercise is named after. A few small fixes change that, and with the right progression the bridge stays hard long after the basic version becomes easy, no weights needed.
In short: lie on your back, knees bent, feet flat and hip-width apart, heels about a hand’s length from your glutes. Tuck your ribs down, push through your heels and drive your hips up until your knees, hips and shoulders form a straight line. Squeeze your glutes for one second at the top, without arching your lower back, then lower slowly. Start with 3 sets of 15 to 20 reps, two or three times a week. When 3 sets of 20 to 25 feel easy, move to a harder version (march, feet elevated, single leg, then the hip thrust with your shoulders on a sofa) instead of adding more reps.
Below: the exact technique, the muscles worked, the mistakes that send the work to your back or hamstrings, nine versions from easiest to hardest with clear criteria to move up, glute bridge vs hip thrust and a six-week plan. If you’d like those glute sets placed inside a full week of training, Titan Mode builds a weekly calisthenics plan around your level, schedule and equipment, with guided sessions and exercise demos.
What is a glute bridge?
The glute bridge is a hip extension exercise done lying on your back: your shoulders and feet stay on the floor while your hips rise and fall. The movement is the same one you use to stand up from a chair, climb stairs or jump forward, which is why it shows up in leg days, warm-ups and rehab programmes alike.
It’s also one of the few hip hinge exercises you can do with no equipment at all. In a bodyweight program it fills the gap that squats leave: squats load mostly the quads, while the bridge loads the hips directly. That’s why our calisthenics leg workout uses it as the base of the hip hinge pattern, alongside single-leg deadlifts and sliding leg curls.
Muscles worked
- Gluteus maximus: the main mover. It extends the hip, lifting the pelvis off the floor, and works hardest in the top position, where the hip is fully straight.
- Hamstrings: they also extend the hip and help hold the bridge. How much they work depends on the position of your feet (more on that below).
- Gluteus medius and minimus: on the side of the hip, they keep the knees from caving in and the pelvis level. They work much harder in single-leg versions.
- Abs and lower back muscles: they hold the trunk rigid so the movement comes from the hip, not from the spine.
- Adductors and quadriceps: smaller roles, keeping the knees in line and in place.
How to do a glute bridge, step by step
- Set up: lie on your back, knees bent, feet flat on the floor and hip-width apart, arms on the floor by your sides, palms down.
- Place your feet: slide your heels toward your glutes until your fingertips can almost touch them. At the top of the rep, your shins should be close to vertical.
- Brace: breathe out and gently pull your ribs down toward your hips, so your lower back is flat or close to it. Keep your chin slightly tucked.
- Lift: push through your heels and the whole foot, and squeeze your glutes to drive your hips up until your knees, hips and shoulders form a straight line. Your weight rests on your upper back and shoulders, not on your neck.
- Squeeze at the top: hold for one to two seconds, glutes tight, ribs still down. The line stops at straight: going higher only arches your lower back.
- Lower under control: take two to three seconds to lower your hips, touch the floor lightly and start the next rep without relaxing completely.
Breathe out on the way up and in on the way down. Keep your knees pointing in the same direction as your toes the whole time.
Cues that help
- “Ribs down, then hips up”: it stops the lower back from doing the work.
- “Tuck your tailbone slightly before lifting”: a small backward tilt of the pelvis at the start puts the glutes in charge.
- “Push the floor away with your heels”: helpful if you feel it in your quads or toes.
- “Knees out a little”: a gentle outward push, as if spreading the floor, turns on the side glutes and stops the knees from caving in.
Common mistakes and how to fix them
| Mistake | What you feel | Fix |
|---|---|---|
| Arching the lower back at the top | Lower back working or aching | Stop at a straight line, ribs down, tuck the pelvis slightly, squeeze the glutes to finish |
| Feet too far from the hips | Hamstrings working hard or cramping | Bring the heels closer so the shins are near vertical at the top |
| Pushing through the toes | Quads, calves, heels lifting | Keep the whole foot down and push through the heels; try lifting your toes slightly |
| Knees caving in | Knees, inner thighs | Feet hip-width, push the knees gently out; use a band above the knees |
| Rushing the reps | Not much at all | Two seconds up, one-second squeeze, two to three seconds down |
| Pushing with the neck or head | Neck strain | Weight on the upper back and shoulders, arms pressing into the floor, chin tucked |
The hamstring cramp is the most common complaint, and it has a simple explanation. A study of single-leg bridges in 26 healthy adults found that with the working knee bent at 90°, hamstring activity was higher than glute activity. When the knee was bent further, to 135° (feet closer to the hips), hamstring activity fell sharply while glute activity stayed about the same (Lehecka et al., 2017). If your hamstrings take over, move your feet in.
Glute bridge progression: from easiest to hardest
Choose the first level where you can do 3 sets of 12 reps with clean form. Move to the next level when you can do the number in the right-hand column with a one-second squeeze at the top of every rep.
| Level | Version | How it works | Move on when |
|---|---|---|---|
| 1 | Two-leg glute bridge | The basic version above | 3 × 20–25 |
| 2 | Paused bridge | Hold each rep 3 to 5 seconds at the top, lower in 3 seconds | 3 × 15 with 3 s pauses |
| 3 | Marching bridge | Hold the top position and lift one foot, then the other, without the hips dropping or twisting | 3 × 10 marches per leg |
| 4 | Feet-elevated bridge | Heels on a step, chair or sofa: longer range, more hamstrings | 3 × 15–20 |
| 5 | B-stance bridge | One foot flat, the other foot forward with only the heel touching, taking about a quarter of the weight | 3 × 12–15 per leg |
| 6 | Single-leg glute bridge | One foot on the floor, the other knee pulled toward your chest or the leg held straight in line | 3 × 12–15 per leg |
| 7 | Shoulder-elevated hip thrust | Upper back against a sturdy bench or sofa, both feet on the floor | 3 × 20 slow reps |
| 8 | Single-leg hip thrust | Same setup on one leg | 3 × 12–15 per leg |
| 9 | Paused or slow-tempo single-leg hip thrust | 3 seconds down, 2-second hold at the top | 3 × 10 per leg |
Turning up the difficulty without weights. Inside each level you have four extra settings before you need the next one: slower lowering (three to four seconds), longer pauses at the top, a resistance band just above the knees, and partial “pulse” reps at the top at the end of a set. Each one makes the same number of reps harder.
Add the hamstrings. Once you’re at level 4 or above, add the sliding hamstring curl: in a bridge position, heels on a towel on a smooth floor (or socks on a wooden floor), slide your feet out and pull them back without letting your hips drop. Start with the eccentric only (slide out slowly, lower your hips, reset), then do full reps on two legs, then on one leg. When those get easy, the Nordic hamstring curl is the hardest bodyweight exercise for the back of the thigh.
Use a band if you have one. A band above the knees isn’t just extra resistance. In a study of 21 healthy adults, pushing the knees out against a band during bridging increased gluteus maximus activity and reduced the forward tilt of the pelvis, without changing hamstring or lower back activity (Choi et al., 2015). That makes it a useful cue for anyone who feels bridges in their lower back.
Glute bridge vs hip thrust
They are the same movement, hip extension, from two different setups.
- Glute bridge: shoulders on the floor. The range of motion is short and the hips start close to the ground. Easier to learn, no equipment, and a good place to fix your form.
- Hip thrust: upper back on a bench or sofa. The hips start lower and travel further, so the glutes work over a longer range. It’s harder and is the version most often loaded with a barbell.
In a comparison with the back squat in 13 trained women, the barbell hip thrust produced higher gluteus maximus and hamstring EMG activity, while the squat produced similar quad activity (Contreras et al., 2015). A systematic review of glute activation also placed loaded hip thrust variations among the exercises with very high glute activation, alongside step-ups and some deadlift variations (Neto et al., 2020). Two limits apply: muscle activation measured by EMG is not the same thing as muscle growth, and those studies used loaded versions. At home, the takeaway is practical: once your two-leg bridge is easy, the single-leg bridge and then the shoulder-elevated hip thrust are the natural next steps.
For a safe setup, use a sofa or bench that won’t slide, place the bottom of your shoulder blades on its edge and keep your chin tucked so your head moves with your body. Your torso and thighs should be roughly in line at the top.
How many reps and sets?
- For strength and muscle: 3 to 4 sets of 8 to 20 reps of a version hard enough that the last two or three reps are a real effort. Rest 60 to 90 seconds.
- As a warm-up: 1 to 2 sets of 10 to 15 easy two-leg bridges before squats, lunges or running.
If a version needs more than 25 reps to feel hard, it’s too easy for building strength. Move up a level.
A 6-week glute bridge plan
Two or three sessions a week, with at least one rest day between them. Do the bridges after your squats or at the end of a no-equipment home workout. Start at the level that fits you; the plan below is written for someone starting at level 1.
| Week | Main exercise | Sets × reps | Notes |
|---|---|---|---|
| 1 | Two-leg glute bridge | 3 × 15 | 1 s squeeze at the top, 3 s down |
| 2 | Two-leg glute bridge + marching bridge | 3 × 20 + 2 × 8 per leg | Hips stay level during the march |
| 3 | Feet-elevated bridge | 3 × 12–15 | Heels on a step or sofa |
| 4 | B-stance bridge | 3 × 10–12 per leg | Easier week: stop 3 reps short of failure |
| 5 | Single-leg glute bridge | 3 × 8–12 per leg | Add the sliding curl eccentric: 2 × 5 |
| 6 | Single-leg bridge or two-leg hip thrust | 3 × 10–15 | Test: max clean single-leg reps per side |
If you can’t reach the bottom of the rep range with clean form, stay on the same week. If you pass the top of the range easily, skip ahead. What makes this work is writing down your real reps each session, so you know when to change versions instead of guessing. In the middle of a busy week, that’s where most people drift: Titan Mode lets you log every set, rests you with a timer and swaps an exercise for an easier or harder version when you need it, with weekly check-ins to track your progress.
After six weeks, keep going up the table: single-leg hip thrusts, then slow tempo and pauses. The glute bridge also pairs well with harder single-leg work; if your goal is a pistol squat, see our pistol squat progression.
Benefits and limits
- Stronger hip extension. The bridge trains the movement behind standing up, climbing, sprinting and jumping, in a position that is easy on the knees and spine.
- Easy to learn and to scale. No equipment, and a progression that goes from rehab-friendly to genuinely hard.
- A good fit for a full routine. It balances quad-heavy squats and complements core work like the plank, which trains the trunk to stay still while the hips do the work.
- It won’t burn fat from your hips or thighs. Spot reduction doesn’t work: a controlled trial found that six weeks of abdominal exercise alone did not reduce abdominal fat (Vispute et al., 2011), and the same logic applies to glute exercises. Fat loss depends mostly on your diet and overall activity; our guide to calisthenics for weight loss explains how to combine them.
- On its own, it’s not a full leg workout. Add a squat, a single-leg exercise and a hamstring curl for complete legs.
- Back pain: be careful with the promises. Bridges are widely used in back rehab and well tolerated by most people, but evidence that they treat lower back pain on their own is limited and mixed. Treat them as one useful exercise, not a cure.
Safety
- Lower back pain during the exercise: almost always an arching problem. Lower the height, keep your ribs down and finish the rep with your glutes. If it still hurts, stop.
- Ongoing back pain, or pain spreading into a leg: get it assessed by a doctor or physiotherapist before training through it.
- Pregnancy: bridges are often included in pregnancy exercise programmes, but lying flat on your back for long periods is commonly discouraged later in pregnancy. Check with your midwife or doctor, who may suggest an inclined or elevated-shoulder version.
- Neck: never push your weight onto your neck. In the hip thrust, keep the bench under your shoulder blades, not your neck.
- Recent hip, knee or abdominal surgery: get medical clearance first.
Small exercise, long progression
The two-leg glute bridge is where almost everyone starts, and it becomes easy quickly. The value is in what comes after: the march, the single leg, the hip thrust, slower reps and longer pauses, each one a clear step with a number to hit. Fix your feet position, keep your ribs down, squeeze at the top and move up when the reps say so. If you want that progression planned and tracked inside a complete week of calisthenics, download the app and set up your plan in a few minutes.
This article is general information, not medical advice. If you have a medical condition, an injury, pain or are pregnant, talk to a health professional before changing your training or diet.
FAQ
What muscles does the glute bridge work?
Mainly the gluteus maximus, which extends the hip. The hamstrings help with the same job, the gluteus medius keeps the knees and pelvis level (especially on one leg), and the abs and lower back muscles hold the trunk still. The quads work a little to keep the knees in place.
How many glute bridges should I do?
For the two-leg bridge, 3 sets of 15 to 20 reps with a one-second squeeze at the top is a good start. Once you can do 3 sets of 20 to 25 easily, don't keep adding reps: move to a harder version such as the march, the feet-elevated bridge or the single-leg bridge, and work in the 8 to 20 rep range again.
Why do my hamstrings cramp during glute bridges?
Usually because your feet are too far from your hips, which makes the hamstrings do more of the work, or because you push through your toes. Bring your heels closer so your shins are close to vertical at the top, push through the whole foot or the heels, and squeeze your glutes before lifting. A study of single-leg bridges found that bending the knee more lowered hamstring activity a lot while glute activity stayed similar.
Is the glute bridge the same as a hip thrust?
They are the same hip movement. In a glute bridge your upper back stays on the floor, so the range of motion is shorter. In a hip thrust your shoulders rest on a bench or sofa, so your hips start lower and travel further. The hip thrust is the harder progression, and it's the version most often loaded with a barbell in the gym.
Can glute bridges make my glutes bigger without weights?
Yes, up to a point, as long as your sets end close to failure and you keep moving to harder versions. The two-leg bridge quickly becomes too easy to build much muscle; single-leg bridges and single-leg hip thrusts, done slowly with pauses, stay challenging much longer. Pair them with split squats or step-ups for complete glute work.
Do glute bridges help with lower back pain?
Bridges are common in rehab programmes and are generally well tolerated, but the evidence that they fix back pain on their own is limited and mixed. If a bridge hurts your back, it is usually a technique problem (arching instead of extending the hip). For persistent pain, or pain spreading into a leg, see a doctor or physiotherapist.
Can I do glute bridges every day?
Easy two-leg bridges as a warm-up can be done daily. For the hard versions that you take close to failure, two or three sessions a week with a day of rest in between is enough to progress and leaves time to recover.
Sources
- Contreras B. et al. (2015). A comparison of gluteus maximus, biceps femoris, and vastus lateralis electromyographic activity in the back squat and barbell hip thrust exercises. J Appl Biomech.
- Neto W.K. et al. (2020). Gluteus maximus activation during common strength and hypertrophy exercises: a systematic review. J Sports Sci Med.
- Lehecka B.J. et al. (2017). Building a better gluteal bridge: electromyographic analysis of hip muscle activity during modified single-leg bridges. Int J Sports Phys Ther.
- Choi S.A. et al. (2015). Isometric hip abduction using a Thera-Band alters gluteus maximus muscle activity and the anterior pelvic tilt angle during bridging exercise. J Electromyogr Kinesiol.
- Vispute S.S. et al. (2011). The effect of abdominal exercise on abdominal fat. J Strength Cond Res.